The Beast, our faithful old VW food van, has finally moved on to a new home. It was an emotional day (for Barny) and one filled with the prospect of finally having enough space on the drive for the vehicles we actually own. Much as the Beast has been very much part of the family, I had already said my farewells some time before, and was relieved more than sad. The second van conversion was more stressful than the first, probably mostly due to the additional quantity of toddler that had to be managed while Barny was doing the work, but also because we were under more pressure to get this one finished.
The ambulance is a replacement for the Beast, rather than a second unit. Betty, our dear old Bedford, is essentially a backup vehicle. She is what will keep us trading if the main vehicle gives up. So there was never any real rush to get her finished, because we had survived without her for several years, trading from our gazebo setup in the dark days of 2014 when the Beast was having a new engine built. This one has more riding on it because it needs to become our big ole’ festival rig that can serve 1000 toasties a day and not panic.

Here it is, festivalling hard.
The off-season involved a fair bit of stripping out ambulance interior and putting all the trappings of a commercial kitchen in. By the time that was complete the summer was upon us, and we had to squeeze a visit from our environmental health officer in between two festivals. They also wanted to do a full inspection of both businesses, which adds an extra level of excitement to only being at home for a few days between events.
I’m very pleased to report that both Yumlaut and the Jabberwocky got a 5 star food hygiene rating, so please continue to buy with your usual levels of enthusiasm, that would be great.
Now that we are officially signed off food van conversion experts, I think it’s about time we shared a few more tips on getting that conversion done yourself. People constantly lament the expense of food trucks, but after a few years in the trade you are painfully sick of erecting gazebos and carrying grills and gas bottles. It took us two months to get sick of it, so I really feel for you.
So make that decision now. Here are some things you will need:
DIY Street Food Truck Conversion List
- You need to be pretty handy and confident with power tools
- Speaking of power tools: The minimum is probably an angle grinder, a jigsaw and a decent drill
- About 100 hours of spare time
- A clear plan of how you want the inside laid out
- A local hardware store (Barny managed 4 trips in one day)
- Metalworking skills and welding gear OR a tame metalworker
- Your new vehicle and prospective food van
Finding the right truck can be a bit of a nightmare, and even once you have found it, you can still enjoy an exciting game of Banger or Bargain.
Conversion Jobs (once you have established your truck actually runs)
Van back on site you need to work out what you are keeping and what you are throwing away. Most of the insides will need to go. In an ambulance this is a major operation (oh yes, medical pun time), in a camper van it’s just violence and a big hammer.
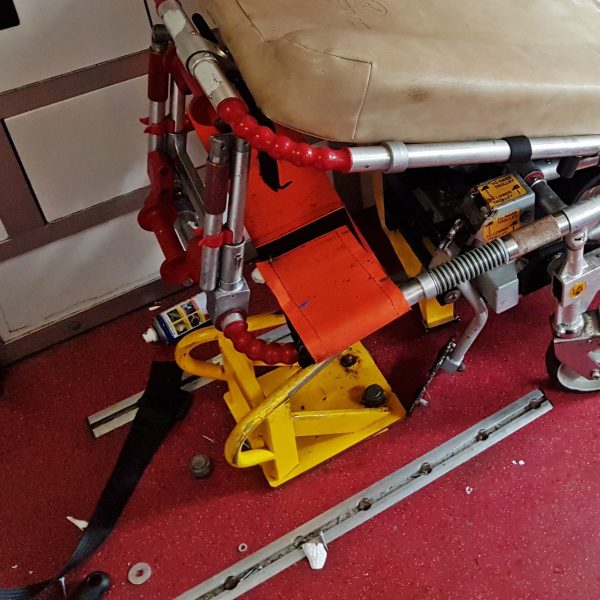
That yellow stretcher mount was, for example, an hour of angle-griding to remove.
Around this time you make a decision about the hatch. How big, how high and which side. From a sales point of view you want it on the prettiest side, as big as you possibly can and as low down as you can realistically work on, so no less than 60cms off the internal floor, ideally more. Any less than that and you will end up bending down all day. Your back will not thank you.
Next you clad the insides in something that cleans easily. We use dibond. I would strongly recommend using something white, both from a cleanliness point of view and because it will make the inside of your food van nice and light. You want to be seen and look open, and every little helps.
Now you need to make the grand decision between gas and electric. We have covered this many times before, most notably here, so read that (and the comments – I’ve added a lot of extra info) and pick wisely. Then work out where everything needs to live, check that you have your workflow laid out correctly, and then get your counters. These will be one of three things:
- Stainless steel: the EHO will love you, they are virtually unbreakable and very easy to clean. They’re also the most expensive.
- A kitchen counter: Your budget option. Can stain, not really cut out for commercial use but still functional.
- Wood: Environmental health may get upset by this, so read up on proper care of wooden surfaces and add relevant info to your cleaning rota and risk assessment. They look cool, but they are fairly heavy.
Food Truck Weight
Remember that in terms of weight added this will be a big load, so marble and granite worktops are a silly idea. Poor truck still needs to come in at well under 3.5 tonnes. Unless you have an LGV license that means you can drive larger vehicles (pre 1997 or a £1000 test) and you want to get them MOTed every 6 months to a much higher standard.
VOSA do test vehicles at certain (usually larger) festivals and can stop you any time and take you to a weighbridge. If you are overweight they can slap you with a fine and (possibly more importantly) stop you from going further until you have removed the excess weight.
The Hatch
This is your big construction project. It can be wood, metal or reinforced plastic. It can open outwards, upwards or be removed entirely. It just needs to be watertight. Outwards means they can double as menu boards. Upwards mean they double as a rain canopy and sunshade. Removing it entirely means you have more options for fastening and, to be honest, it can look like anything and be made of anything, because your customers will never see it.
Keep it as light as you possibly can, as with all things in the van, but make sure that it isn’t going to get torn off or flap about in high winds. The hatch on the Beast weighed significantly more than I did, and would have actually killed someone if it had come down on top of them. Upwards opening hatches will need gas springs (the things that hold your car boot open) which have been properly rated for the weight of the load they are bearing. We use Eckold if you are in the West Midlands, but I’m sure other suppliers exist.
The Paint Job
Your options here are as many and varied as they come, and will depend very much on your budget. If you can afford a full respray and custom artwork, then you probably want that. It will make you look a little corporate, but that is not necessarily a bad thing (although I am seriously biased towards DIY finishes here).
So your DIY finish can be paint or vinyl (or astroturf, clapboarding, fake fur – you can go a long way off piste here and make an otherwise humdrum van look cool). We use Tekaloid paint as you can just slap it on with nothing more than a quick scrub with some sand paper. Don’t try this in cold weather, pick a nice warm day. Tekaloid doesn’t like the cold. The same weather warning applies to vinyl actually. We bought a good quality vinyl and initially tried to use big sheets to cover large areas. That’s all good fun if you do it for a living, but much, much harder than it looks. You can get an almost identical effect by using lots of smaller pieces. Betty is done in this way and people only notice when you point it out, and problems are much more easily fixed later.
The Finish
Our first conversion took us almost two years. The second took around two months. Although both required around the same amount of actual work, we had a deadline for the second one. Peddler Market was our first long distance engagement ever, and would have been beyond our range in the Beast or Betty. We made it there, just in time and with not quite the right menu boards, but it meant the ambulance was up and running in time for 2017. If you are a bit dithery about the details, it might be worth booking something to keep you focused on the prize.

The benefits of a deadline. The Ambulance made it to Peddlar market in Sheffield – a journey we would not have attempted with ether of our other vans (albeit with some boards cunningly cannibalised from the Beast).
All the best with your awesome conversion, and please post a picture below if we were in any way helpful! Any related questions please slap down there as well, we will do our best to get back to you quickly.


hi,
very nice stuff for us ,
regards,
mansi desai
This blog is such good inspiration that a seemingly impossible task is doable, it’s really appreciated. I have a question about cladding/counters/things staying in place, I understand that we would need to clad the whole van (behind counters etc) but the cladding i’ve been looking at is about 2cm thick so I was unsure about drilling through it – how did you go about securing your counters to the van wall?
Love this information, so thank you. I’ve been in the mobile catering industry for almost 20 years, always with a trailer and towing. We now have the opportunity to either sell my partners Ford transit van that is no longer needed, or I’m thinking shall we convert it and make a catering unit, or coffee shack, that I can run along side the trailer at festivals. My fella is a joiner and could do most of the work. It is only a SWB though, wondering if we’d struggle space wise, and thinking where gas bottles would go. It’s just a shame to sell this van when we’ve had it from new and full service history. It’s 9 years old. But the idea of putting a hatch in and having another catering unit is entriging me. Adele